
Run a 100 FPS GPU-rendered Vim With macOS Hot Keys, Shared Copy & Paste, Remote Collaboration, Session Save/Resume, Crash Recovery, and More
By following the hot keys setup in this article, we can make terminal Vim/Neovim feel just like any native app, or working in an editor like VS Code. You’ll be able to use Vim in iTerm2, Kitty, or Alacritty—or your terminal of choice—while still keeping your standard hot keys for copy, paste, switching tabs (this guide will focus on binding command key, but you can substitute with control key.) By running your Vim in a terminal, you get features like collaborative editing for free (through Teleconsole).
Pair it with my recommended Vim config for a fully loaded yet blazing fast IDE experience:
- Lightning-fast 100 FPS GPU-rendered Vim (via Kitty) that’s still easy on your processor and battery
- Full mouse support: switch tabs by clicking, click on menu items, select text, etc.
- Full standard OS hot keys: CMD+C/V to copy and paste, CMD+T for new tab, CMD+W to close tab, CMD+{ or } to switch tabs, etc. (whoever told you that you can’t map the command (⌘ CMD) key in regular VIM was wrong!)
- Code hints, auto complete, syntax and code linting, type and method signatures—all as you type
- Super fast project-wide file search and even text/symbol search
- Save and resume sessions, even on crashes
- Live synced editor for remote collaboration (via Teleconsole)
- And much more!
Running Vim in the terminal opens you up to the terminal ecosystem, including tools like TMUX or Teleconsole, which lets you share your terminal session with a remote user for real-time live collaboration. It’s also one less app to open.
You can either bring Vim to VS Code or bring VS Code to Vim. I’ve found Vim emulation in VS Code to be too slow and unresponsive. But most importantly, I lose out on the Vim plugin ecosystem. Getting most of the VS Code features in Vim is actually quite easy. It’s a well covered topic. You can install a fully configured Vim setup like Spacevim (or even Spacemacs), or install the individual plugins yourself using a plugin manager like vim-plug (easier) or dein.vim (harder) and configure your vimrc file to suit your exact needs. If you want something lighter and easier to customize, you can try using my vim config that’s already configured with the features mentioned above. Clone it and make it your own (that’s what did from the last guy).
The rest of the guide will mainly be about making Vim/Neovim feel like a native dedicated app by running it in a blazing fast terminal emulator called Kitty with configured hot keys.
- Setting up Vim or Neovim to run inside TMUX (optional) running in Kitty, a wicked-fast GPU powered terminal.
- Making hot keys work in Kitty just like in the rest of your OS.
CMD+CorV,CMD+W,CMD+{or}tab switching, etc. - Making those same hot keys work in iTerm2 and other terminals like Alacritty
- Fully resumable sessions—even on computer reboots or system crashes!
Introducing GeoVim: Running (Neo)Vim in Kitty
Install Kitty, a Hyper-Fast GPU Powered Terminal
Kitty can be launched with the special key profile we’ll be using so it doesn’t interfere with your regular terminal activities. If you plan to just use iTerm2, you can skip this section and just grab the GeoVim key profile config for your terminal. I’m calling my Neovim inside Kitty setup “GeoVim.” Kitty is a super-fast terminal emulator that uses your GPU to render at 100 FPS (configurable based on your needs). Kitty is fast. The speed I’m talking about is not how fast it prints text on the screen, but how responsive the feedback is on screen. On a standard 60hz inch Macbook screen typing is noticeably more responsive than iTerm2. The effect is even more noticeable if you try to scroll up and down really fast. Humans do not need to consciously perceive fast refresh rates in order to benefit from them. You can maximize the responsiveness by using it with a 144hz monitor. The developer has claimed that his goals are still to keep the terminal energy and resource efficient though, something I will be thoroughly benchmarking in the future.
Install Kitty with Homebrew, which includes macOS GUI integration out of the box.
# macOS: use homebrew
brew cask install kitty

# Ubuntu 18.10+: aptitude
sudo apt install kitty
Clone Repo or Grab GeoVim Files
Linux Users: Linux support is untested, but should work.
Make sure to install ruby and tmux (if you want tmux enabled).
Either clone my Neovim repo into ~/.config/nvim, or just grab the folder below and place it somewhere. I recommend placing it in ~/.config/geovim if you don’t plan on using my Vim config.
GeoVim files: https://github.com/chrischen/vim-config/tree/master/geovim
Add this to your .zshrc or .bashrc, and modify GEOVIM_PATH accordingly.
# Set this path to where you saved the above folder
export GEOVIM_PATH="$HOME/.config/nvim/geovim"
# Or this if you use my Vim config
# GEOVIM_PATH="$HOME/.config/nvim/geovim"
export GEOVIM_EDITOR="nvim" # Set to "vim" to use Vim
export GEOVIM_TMUX=1 # Set to 0 to disable TMUX

# The default command to invoke geovim is 'gvim'
# alias mvim=gvim
source "$GEOVIM_PATH/geovim.sh"
The gvim command now lets you open somefile.txt and have Kitty -> TMUX -> Vim open up automatically with the file you specified.
# When we're done you'll be able to run this from your shell and it will launch your editor with the file + resume your session
gvim someFile.ts
You can also switch out Kitty for Alacritty. Open launch_geovim.sh to change the options:
# launch_geovim.sh

session="geovim"
# terminal_app="alacritty" # Use alacritty - don't forget to install it
terminal_app="kitty" # Use kitty
...
Install NeoVim
I highly recommend Neovim instead of regular Vim 8, as I’ve found some UI blocking behavior happens when typing with live code completion and syntax checking. It’s mostly a drop-in replacement so if you want to use Vim you still can. It may just be better plugins, but in Neovim I’ve never encountered any freezing while typing. Neovim does have a bug when scrolling, but only if you scroll really really fast.
# macOS: homebrew
brew install neovim

# Ubuntu: aptitude
sudo add-apt-repository ppa:neovim-ppa/unstable
sudo apt-get update
sudo apt-get install neovim
Getting Command and Control Hot Keys to Work
Getting Vim to receive and use special keys like Command and Control key will require getting the terminal to send custom key sequences and Vim to receive and map those sequences.
Configuring Kitty to Send macOS Custom Hot Keys
The GeoVim launcher script will use the bundled Kitty config file. These are preconfigured for standard macOS shortcuts, so you’ll need to edit the file if you want to change the key bindings. The config file is located at geovim/conf/kitty.conf. These keybindings will only be used in your GeoVim instance, so if you plan on using Kitty as your terminal, they won’t interfere with standard hot keys for your terminal shell.
Linux users: replace with your preferred hotkey instead of Command. Cmd should map to the Windows key though. If you plan to use the Kitty as your primary terminal, it also has a handy Ctrl+C smart mode that operates as both interrupt and copy. You’ll want to put those key bindings in ~/.config/kitty/kitty.conf instead.
Configuring Alacritty to Send macOS Custom Hot Keys
Alacritty is also a GPU-powered terminal emulator. It’s barebones, and does not have features like tabs, windows, or any UI apart from the terminal window itself. TMUX is required to make it practical. It’s an alternative to Kitty, but I’ve found Kitty to feel more responsive and be better adapted to our setup (for example, shift+select with mouse doesn’t work in Alacritty).
The GeoVim launcher will also take care of loading hot key configs for Alacritty. But if you use Linux you may want to remap the Command key to Ctrl or something else. Just open geovim/conf/alacritty.yml and edit the key_bindings: section.
key_bindings:
  # Sends <M-'> to comment/uncomment lines
  - { key: Apostrophe,        mods: Command, chars: "\x1b'" }
  # Sends <M-]> and <M-[> for indenting lines
  - { key: LBracket,        mods: Command, chars: "\x1b[" }
  - { key: RBracket,        mods: Command, chars: "\x1b]" }
  # Mapped to Ctrl+S which saves in Vim
  - { key: S,        mods: Command, chars: "\x13" }
  # Sends <C-S-Insert> for Select All
  - { key: A,        mods: Command, chars: "\x1b[2;6~" }
...
If you want to bind other custom keys, try using xxd -psd in your terminal to get the hex codes. You can also use Key Codes.app, type Ctrl+V in your terminal followed by the key combo, or run cat and then type your key combo. Certain key combos won’t work this way, such as Ctrl+C, but if I type Ctrl+V followed by Ctrl+Shift+(up arrow key) I’d get ^[[1;6A which is the escape sequence to use. ^[ is the ESC (hex 0x1b) key (which is the same as pressing Ctrl+[), followed by a string of [1;6A. This is sent by the terminal as sequential key presses.
Configuring iTerm2 to Send macOS Custom Hot Keys
iTerm2 has a nifty automatic profile switching feature that allows it to activate our custom key bindings only if Vim or Neovim is open, so it won’t interfere with your normal shell usage. If you aren’t using TMUX with this setup, you may want to edit the profile in iTerm2 to not trigger when TMUX is run. You can edit this in Advanced -> Automatic Profile Switching after loading the profile. Because the profile can be automatically activated, you won’t need to use the GeoVim launcher for Vim in iTerm2.
Note: my default config overrides new tab/switch tab hot keys to work in the Vim window. If you don’t want that, make sure to delete or re-map the Cmd+T and Cmd+Shift+[ or ] hot keys.
Load The iTerm2 Profile
Grab the iTerm2 profile from geovim/conf/iTerm2.json. In the menu bar click on iTerm2 -> Preferences and then click on the Profiles tab.
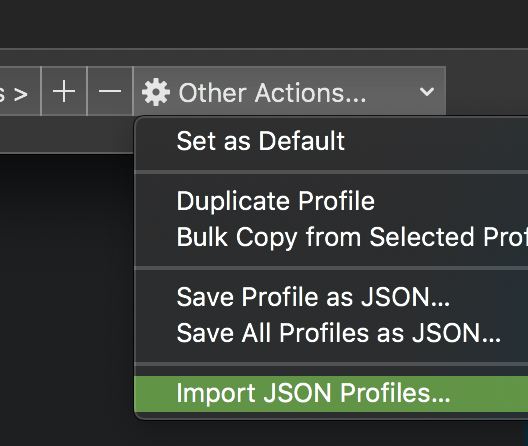
geovim/conf/iTerm2.jsonReceiving The Hot Keys In Vim
The next step is to take these key combos sent from your terminal and trigger the right actions in Vim. The Command ⌘ <D-...> (“super” key) Vim key binding only works in MacVim. We still won’t be able to use it, but we’re getting around that by taking advantage of escape sequences.
In recent versions of terminal Vim you may notice that CMD+V may actually work—at least slightly. This is because your terminal is sending a bracketed paste. Vim still knows nothing of the command key, but is just handling a special string sent from the terminal app. Terminals actually send a string with an escape sequence surrounding your clipboard contents (sort of like HTML tags) which is parsed by Vim, or your shell, to trigger a paste action. This allows apps running in your terminal, such as Zsh, to know that this content is pasted, and treat it in special ways such as not executing it automatically.
\e[200~Some text in your clipboard ending in a newline\n\e[201~
# Here \e is also known as Esc, ^[, Ctrl+[, or 0x1b
However as of the time of this writing, there are still quirks to this behavior in Neovim which means we’ll have to re-implement this functionality to get it working perfectly. Plus, CMD+C copying still won’t work if you have mouse support enabled in Vim because text selection triggers a visual selection in Vim, preventing your terminal from highlighting it (you can still yank with y though).
Configuring Vim
This section is not necessary if you use my Neovim configuration.
Add the following to your ~/.vimrc or ~/.config/nvim/init.vim (neovim) config file.
" GeoVim {{{
" ----------
" Remap Paste Key Mappings
" ----------
" Insert mode paste
inoremap <C-Insert> <C-r>*
" Command mode paste
cnoremap <C-Insert> <C-r>*
" Normal mode paste
nnoremap <C-Insert> P
" Visual mode paste (without yanking replaced text)
vnoremap <C-Insert> "_dP
" Remap Copy Key Mappings
" ----------
" Remap copy to work in neovim
vmap <M-[>2;5+ y
" Remap copy to work in vim8
vmap [2;5+ y
" Select all
noremap <C-S-Insert> <Esc>ggVG
" Remap Indent
" ----------
vmap <M-]> >gv|
vmap <M-[> <gv
nmap <M-]> <Esc>v><Esc>
nmap <M-[> <Esc>v<<Esc>
imap <M-]> <C-t>
imap <M-[> <C-d>
" Remap Comment (Requires caw.vim plugin)
" ----------
vmap <M-'> gcc
nmap <M-'> gcc
imap <M-'> <Esc>gcci
" Remap quit all to Alt+q (requires Alt to send escape)
" ----------
noremap <M-q> <Esc>:qa<Enter>
noremap <M-[>qa! <Esc>:qa!<Enter>
noremap ^[[qa! <Esc>:qa!<Enter>
" Remap save
" ----------
inoremap <C-s> <Esc>:w<Enter>i
vnoremap <C-s> <Esc>:w<Enter>v
nnoremap <C-s> <Esc>:w<Enter>
" Make Shift+Click work to extend visual selection
" ----------
nnoremap <silent> v :let b:v_mode='v'<CR>mVv
nnoremap <silent> V :let b:v_mode='V'<CR>mVV
vnoremap <expr> <S-LeftMouse> '<Esc><LeftMouse>mN`V'.b:v_mode.'`N'
" }}}
Now when you press CMD+V Vim will will paste correctly whether in insert, visual, select, or command mode. CMD+C will trigger a yank, and CMD+A will select all. The goal is to mimic the behavior in GUI Vim like MacVim. You may also want add this to your .vimrc to sync your clipboard with your OS clipboard. The + clipboard register is shared between macOS and Vim. Disable it if you do not want copy or paste to replace the contents of the OS clipboard.
if has('mac') && has('vim_starting')
  let g:clipboard = {
  \   'name': 'macOS-clipboard',
  \   'copy': {
  \      '+': 'pbcopy',
  \      '*': 'pbcopy',
  \    },
  \   'paste': {
  \      '+': 'pbpaste',
  \      '*': 'pbpaste',
  \   },
  \   'cache_enabled': 0,
  \ }
endif

if has('clipboard') && has('vim_starting')
  set clipboard& clipboard^=unnamed,unnamedplus
endif
Add Your Own Custom Key Bindings
There are keybindings that work in GUI apps but not in terminal Vim, such as Ctrl+Enter. Most terminals won’t be able to distinguish between Enter and Ctrl+Enter. I’ve pre-added bindings for these modifiers if you want to use them.
# In your vimrc...
# To bind <C-Enter>
map C<Enter> ...
# To bind <S-Enter>
map S<Enter> ...
# <C-S-Enter>
map C-S<Enter> ...
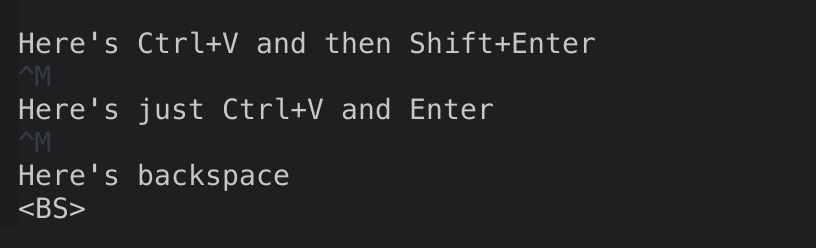
Pro Tip: To figure out if your terminal is actually sending certain key combos to Vim, go in insert mode and press Ctrl+V, followed by your key combo. If it doesn’t seem to distinguish the added modifiers, you’ll need to define custom key sequences and receive them in Vim like above.
Install Obsession Vim Plugin For Tab State Save/Reload
This section is not necessary if you use my Neovim configuration.
Install https://github.com/tpope/vim-obsession using your preferred vim plugin manager. I recommend Vim-Plug (easier to use) or Dein (harder to use). No further configuration is necessary as the GeoVim launcher will take care of starting sessions.
Auto Saving and Resuming Sessions
TMUX is used to primarily allows us to open multiple Vim sessions rooted in different project directories without having to launch multiple instances of the terminal. It’s also remotely scriptable, which allows the launcher to do smart file opens (for example it will open a file in an existing project into a new Vim tab if the project is open). TMUX is optional, and can be disabled in launch_geovim.sh. If disabled, Vim sessions will still function (restoring your Vim tabs), but new files will have to be launched in separate terminal windows unless you open them from within Vim.
Install TMUX plugin manager if you haven’t already. If you are using Prezto, you’ll need to initialize plugins in .tmux.conf exactly as shown below, instead of what it tells you in the default instructions.
Configure TMUX
Add this to the end of your tmux.conf or tmux.conf.user file.
# Meta + W (Meta is the same as Alt/Option when configured to send ^[ + escape
# sequence. This will send ":qa" to all Vim windows
bind M-W run-shell "tmux list-panes -s -F '##{session_name}:##{window_index}.##bind M-w run-shell "tmux list-panes -s -F '##{session_name}:##{window_index}.##{pane_index}' | xargs -I PANE tmux send-keys -t PANE M-q C-d"
# Kills TMUX and all windows without saving
bind C-q confirm-before "kill-session -t geovim"

# This ensures that any new TMUX windows spawned via Prefix+c runs your shell
# instead of another instance of Vim
bind c new-window -e GEOVIM=0

# tmux-resurrect config options - do not turn these on as it interferes with our manual resurrection
# set -g @resurrect-strategy-vim 'session'
# for neovim
# set -g @resurrect-strategy-nvim 'session'

# Do not turn this on as we restore TMUX sessions manually
# set -g @continuum-restore 'on'

# List of plugins
# tpm - Plugin manager (required)
# tmux-sensible - sensible defaults (optional)
# tmux-resurrect - allows saving/restoring TMUX windows (required)
# tmux-continuum - autosaves via resurrect (required)
set -g @tpm_plugins '           \
   tmux-plugins/tpm             \
   tmux-plugins/tmux-sensible   \
   tmux-plugins/tmux-resurrect  \
   tmux-plugins/tmux-continuum  \
'

# Initialize TMUX plugin manager (keep this line at the very bottom of tmux.conf)
run '~/.tmux/plugins/tpm/tpm'
The TMUX plugins will periodically save the state of your TMUX windows, while vim-obsession will save your Vim tabs on changes (new tab, close tab, etc). The GeoVim launcher will automagically resume all the open files and terminals from your last session—even when you restart your computer or recover from a crash. You can manually save/restore your TMUX windows with the following key combos:
Save: Ctrl-A followed by Ctrl-S
Restore: Ctrl-A followed by Ctrl-R
If you disable TMUX, you can still get Vim session save/restore by manually triggering it. You only have to do this once in any given project directory as it will detect and read the created Session.vim on subsequent opens. Vim session tracking also needs to be turned on manually if you open a specific file to edit as in gvim someFile.ts as opposed to just launching gvim with no arguments. This is to prevent it from littering random directories with Vim session files.
# Type this command in Vim to manually turn on Obsess (for session tracking)
:Obsess
Performance
I haven’t fully evaluated the energy impact of this setup yet. In a future post I will be reporting back on detailed energy consumption stats.
Collaborative Editing
Because Vim is now running inside the terminal, we can take advantage of utilities made for the terminal such as Teleconsole, which allows a remote user share control of your terminal and collaborate live. Now we have a VS Code style IDE with real time collaborative editing for free! Important: turn off TMUX or just run Vim by itself for this.
# Turn off TMUX!
# Launch teleconsole (install it first)
$ teleconsole
$ ... you'll be given a link to share ...
$ nvim